2. Create file API [ D_pxNewFile ]
Goal:
Create a UI (section rule) where you can add or remove rows (Page List). This UI constructs a page list. You also place a button after the page list, and on click this button, this page list data is saved into a CSV file and uploaded to repository.
To create a file with this D_pxNewFile API, pass in the following parameters:
There are two approaches to use this API. One is to handle a file by String, and the other is to handle it by Stream although there is no parameter to differentiate these like Get file API.
Steps:
1. Create an section, where you can add or remove rows in the page list. In this example, I have created a data class (CA-CosmosApp-Data-CustomerDelegation ) and page list property that points to this data class. I have placed a table that references this page list in the section of the work class.
2. Keep the button that runs an activity. And with this on click of button the system should generate the CSV File and it should upload it to Repository.
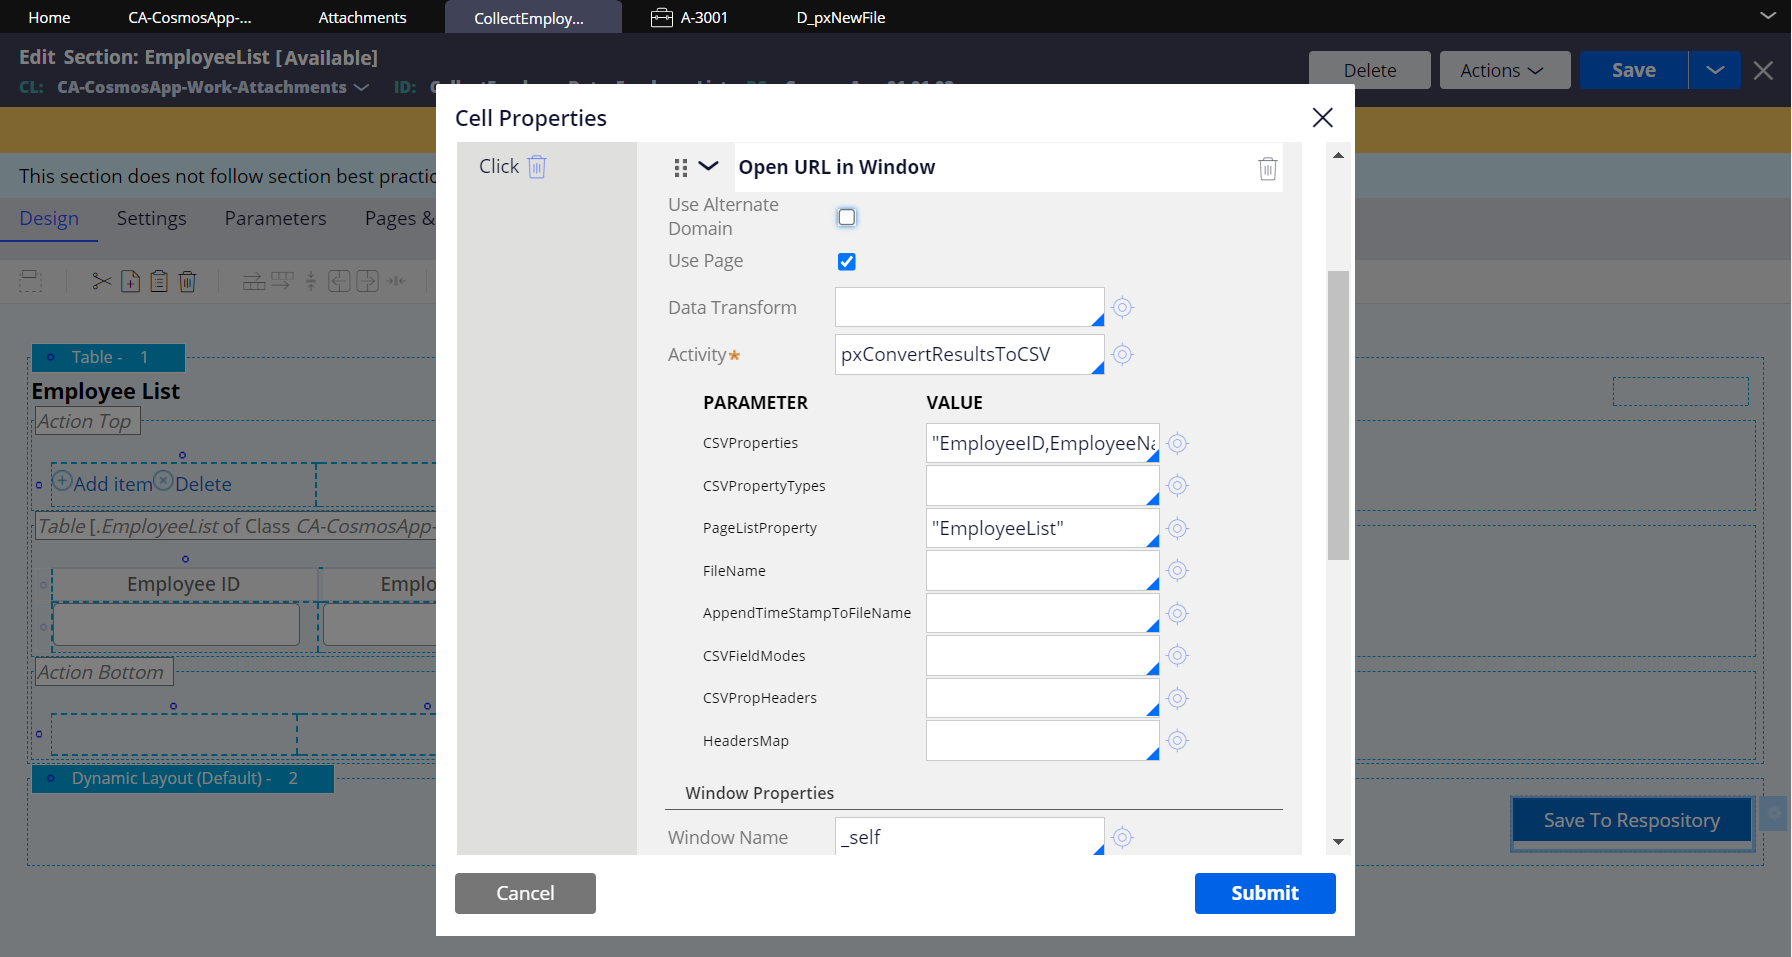
3. Configure this button in the secton to call OOTB activity, "pxConvertResultsToCSV" to make sure it works. Note: This is for testing purpose wheather data getting generated in CSV file or not.
4. Use "Open URL in Window" for action on click of button. We have to give CSV properties i have given two properties. Also enter "_self" in Window name, so extra window doesn't pop up on screen.
5. All done. Let's test and check CSV file downloading correctly or not.
6. Provide the details in the UI Screen and check in clipboard details are stored under page list if not Click on save button and if available then click on the "Save to Repository" button in the screen.
7. Next step is to create another activity to upload this CSV file to a repository. Let's reuse this pxConvertResultsToCSV. Do Save As this activity and save it into your ruleset.
8. Do not override it. Give a different name. In this example, I named it as "UploadCSVToRepository".
9. First of all, add an new entry to Pages & Classes. Add "D_pxNewFile" in Page name, and add "Embed-Repository-File" in Class.
This is not the end of the steps and I will explain further dividing by String approach and Stream approach below.
2-1. String approach (responseType)
1. I have commented out the Step 6 as I do not need to download the CSV file any longer in the screen . Also I added three steps - Step 7, 8, and 9.
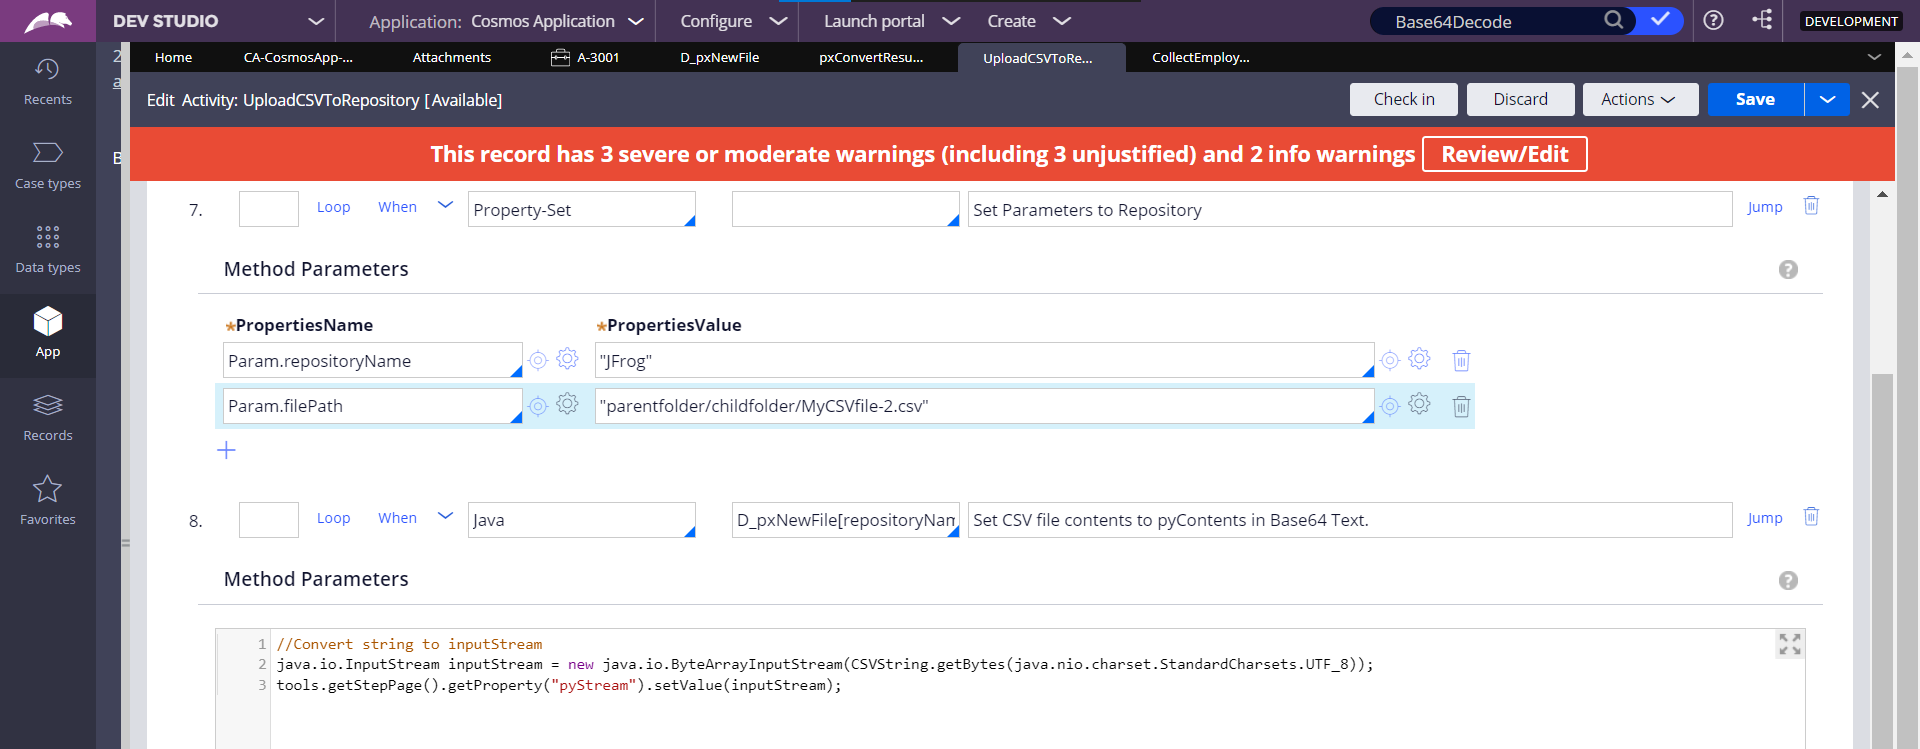
2. In the Step 7, I am setting two required parameters - repositoryName, filePath
For filePath parameter, if you want to write the file to the root path, you can write only file name. In this example, since I want to store it under "parentfolder/childfolder" folder, So I typed "parentfolder/childfolder/MyCSVfile-1.csv".
3. In the Step 8, I am putting the Base64 encoded text of CSV file into .pyContents property in the Data Page. Make sure Step Page for Step 8 is D_pxNewFile[repositoryName:Param.repositoryName,filePath:Param.filePath].
Note: pyContents is an OOTB Text property. You need to put file here by String that is Base64 encoded.
4. In the Step 9, I am writing / overwriting to repository by passing in the necessary parameters to save the file into the repository.
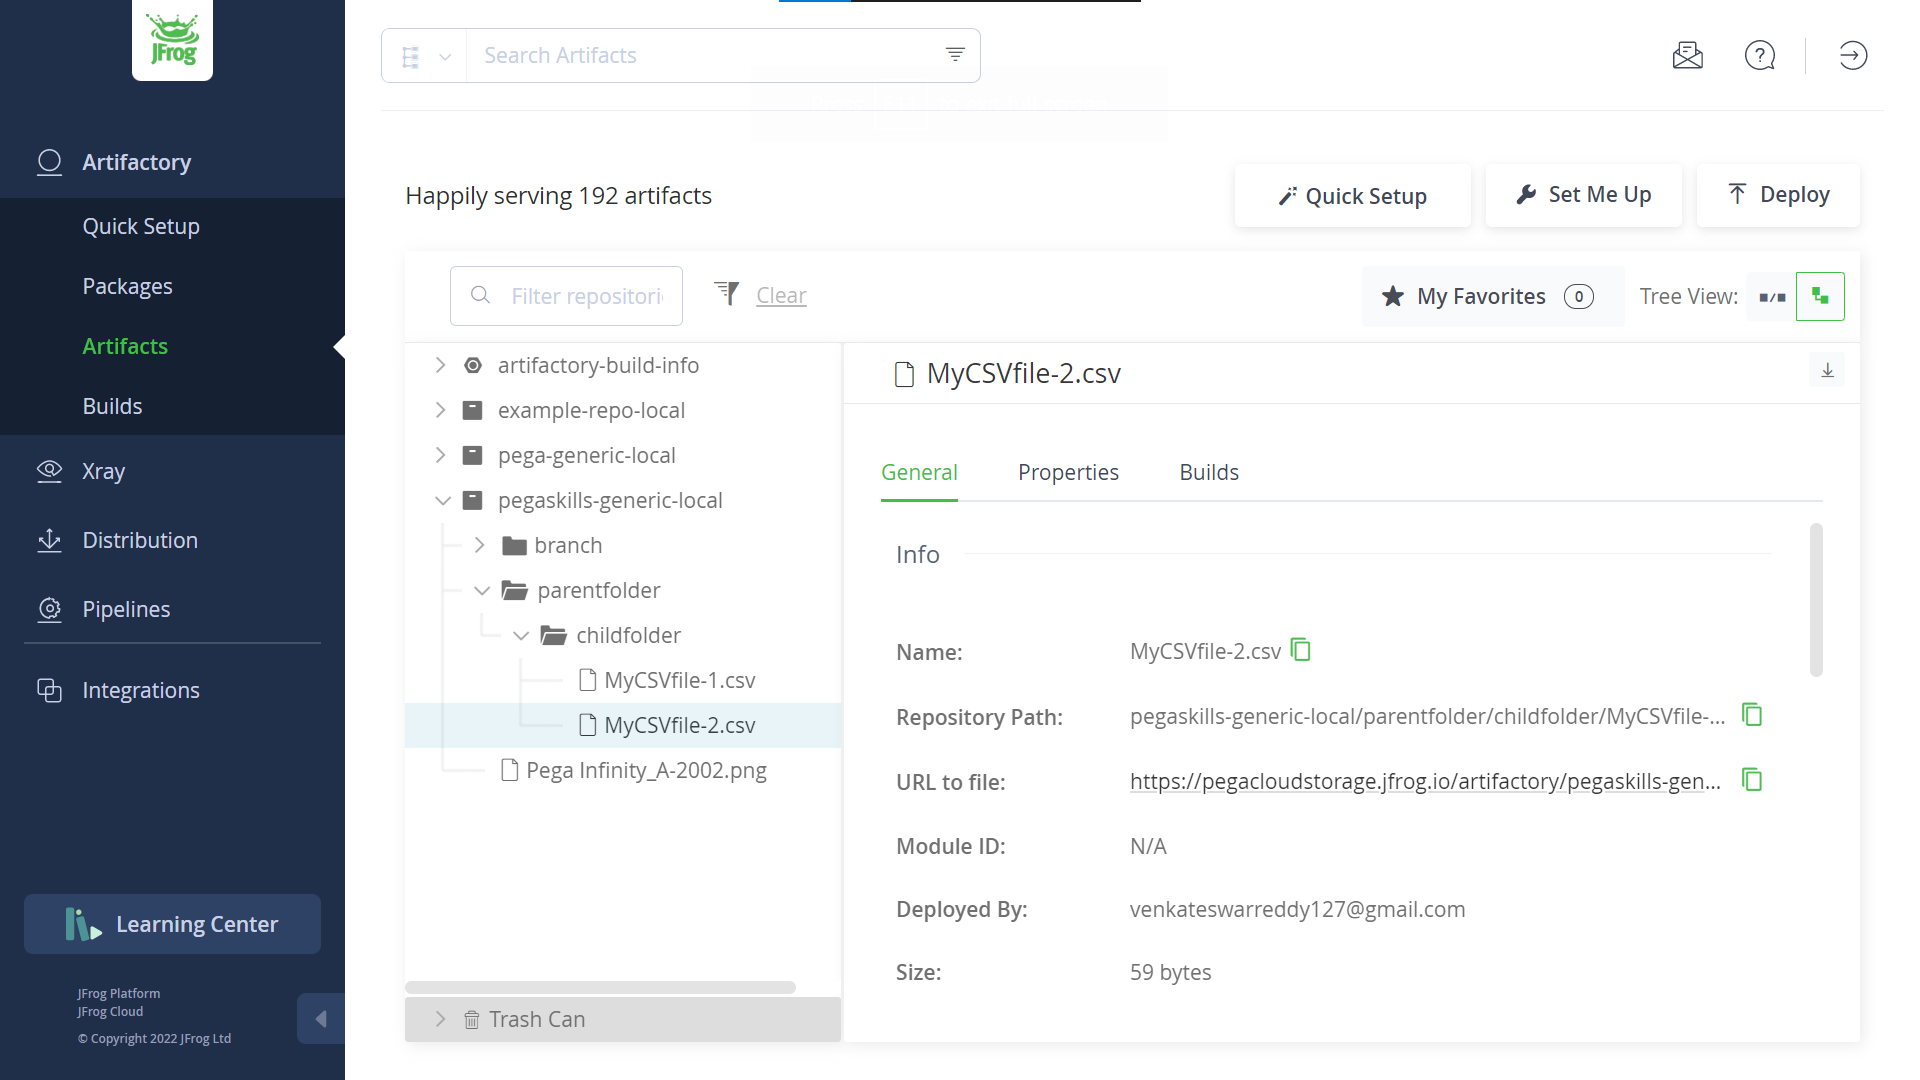
6. Now, let's test. When I click the button, the CSV is successfully uploaded to JFrog Repository as below.
2-2. Stream approach (responseType)
This section explains how to handle the file by Stream.
1. The only difference between String approach and Stream approach is Step 8 in the "UploadCSVToRepository" activity. The rest of modifications (Step 6, 7, 9) are the same as 2-1.
2. In the Step 8, write below Java code - this is to set file contents in stream format.
//Convert string to inputStreamjava.io.InputStream inputStream = new java.io.ByteArrayInputStream(CSVString.getBytes(java.nio.charset.StandardCharsets.UTF_8));tools.getStepPage().getProperty("pyStream").setValue(inputStream);
2. Now That's it. Test it and make sure everything works fine and check it in Repository wheather a new file created or not.
Note:
You may have noticed, there is no parameter in D_pxNewFile Data page to specify if it is String basis (.pyContents) or Stream basis (.pyStream).
How does Pega Platform handle this then?
What if you set both properties (.pyContents and .pyStream)?
For Testing purupose, I set two different files in both.
The result was, file on String was uploaded. This proves that Pega takes precedence String (.pyContents) over Stream (.pyStream).


.png)


0 Comments